SharePoint Meeting Workspace error in Meeting Minutes - 'g_instanceID' is not defined

What a fine morning! A happy client, a happy portal... navigate to the meeting workspace and boom! The left navigation that lists meeting dates are not clickable any more... huh?

This problem started occuring when I switched the portal master page to inherit a custom one that looked really nice :) Following the change, all meeting workspace sites would pop-up an annoying javascript error: 'g_instanceID' is not defined

A few verification moves concluded that all meeting workspaces in SharePoint inherit a master page called "mwsdefault.master" that is located in the 12 hive template\global directory. This default meeting workspace master page is static in all meeting workspaces and includes code that is missing in the custom master pages that I built. Error!

To fix this issue:

  • Open you custom master page in SharePoint Designer
  • Copy the missing code from 'mwsdefault.master' into your custom master page at the top along with other register tags. The register Microsoft.SharePoint.Meetings tag prefix that has been copied from my mwsdefault.master is same as yours. So you can copy the one below:

<%@ Register Tagprefix="Meetings" Namespace="Microsoft.SharePoint.Meetings" Assembly="Microsoft.SharePoint, Version=12.0.0.0, Culture=neutral, PublicKeyToken=71e9bce111e9429c" %>

  • After completing the above, copy the Meetings:PropertyBag control into your custom master page. Copy the one below and paste it right after the Body tag.

Save your custom master page, check-in, approve and go live!

Changing SharePoint file upload limit

The default file upload max. limit set by SharePoint during installation is 50MB. Consideribly, this limit should just fit into your agenda unless you want larger files being exchanged on your network. Note that this could affect the performance and availability of network bandwidth to other applications!

I would consider a case when you plan to use SharePoint as your DMS or ECM solution. This could demand for larger files to be uploaded to your portal. In that case, let's have a look at how we can modify this limit:

  1. Navigate to your portal Central Administration > Shared Services Administration.
  2. You will see a list of Web Application associated with your SSP. Click the required web application that needs the modification to its upload limit.
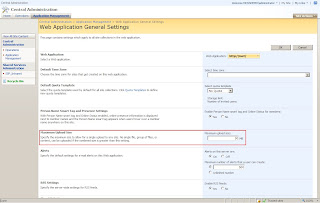
  3. You will navigate to the Web Application General Settings Page. Scroll to the section "Maximum Upload Size" and modify the limit as per your requirement (see screenshot below).

Note: The value for maximum upload size should not exceed 2047 MB


Displaying attachment link in a SharePoint custom list form - "DispForm.aspx" modified

A recent experience of mine while working with SharePoint lists where we required to customize the out-of-the-box list item display form "DispForm.aspx" to present a design-frenzy item view format.

During the modification process, we never assumed that the list item attachments would abruptly dissapear from the display form. All we were looking to do was to display the list item in a good looking format by modifying the XSLT, but the attachments were gone!

Lesson Learnt: Never modify the out-of-the-box list item display form "DispForm.aspx". Create a new one if you need to and call it "DispForm_WhateverYouCallIt.aspx"

Now the attachments that were gone seemed quite easy to be brought back on the page. It needed a SharePoint control AttachmentsField that went missing from the picture. Below is the code that you need to add into the XSLT template dvt_1.rowview (into your custom form) that constructs theDataFormWebPart that SharePoint Designer creates for you when you insert a Custom List Form:


Was that easy? The attachments are now showing in the custom form that you just created. Happy Coding!

Office SharePoint Server 2007 and Windows SharePoint Services 3.0 - SP2 out now!

Microsoft have recently released (Apr 28, 2009) Service Pack 2 for Office SharePoint Server 2007 and Windows SharePoint Services 3.0, available for download through the Microsoft Download Center.

Highlights of SP2

  • It is an all inclusive (SP1 + new SP2) that contains several enhancements targetted to improve server-farm performance, availability and stability.
  • A new stsadm operation has been added to help customers prepare for the upgrade to the next version of SharePoint.
  • Reliability improvements in Indexing and Index Corpus
  • Security Improvements
  • New STSADM Commands including some to fix corruption and relationships (orphaning)

It is highly recommend to install the new service pack for its variety of benefits, including improved performance and availability, improved interoperability, broader support for browsers (apart from MS) and preparation for the next version of SharePoint.

For a detailed explanation on SP2 and its benefits, go to: http://go.microsoft.com/fwlink/?LinkId=148551

Full details on SP2, including upgrade guides, KB articles, downloads and install steps can be found at the link below (MS SharePoint Team Blog):
http://blogs.msdn.com/sharepoint/archive/2009/04/28/announcing-service-pack-2-for-office-sharepoint-server-2007-and-windows-sharepoint-services-3-0.aspx

Implementing SQL Server 2005 Reporting Services with SharePoint 2007 - Dashboards (Part I)

One of the very handy ways to get your dashboards running on SharePoint is to use the friendly SQL Server reporting services engine provided with SQL Server 2005. It is important that you have the following prerequisities before you attempt the game!

You need to have:

  • MS SQL Server 2005 with SP2 (mandatory) [installed]
  • MS Office SharePoint Server 2007 [installed]
  • MS SQL Server Reporting Services Web Parts for SharePoint downloadable here

Step I: Installing SQL Server 2005 Reporting Services

  1. Insert the Microsoft SQL Server 2005 product CD into the CD Drive.
  2. Click Start, point to Settings, and then click Control Panel.
  3. In Control Panel, double-click Add or Remove Programs.
  4. In Add or Remove Programs, click Microsoft SQL Server 2005, and then click Change.
  5. On the Component Selection page, expand SQL Server 2005 instances, select MSSQLSERVER, and then click Next.
  6. On the Feature Maintenance page, select Reporting Services, and then click Next.
  7. The Microsoft SQL Server Installation Wizard starts.
  8. On the Welcome to the Microsoft SQL Server Installation Wizard page, click Next.
  9. On the System Configuration Check page, click Next.
  10. On the Change or Remove Instance page, click Change Installed Components.
  11. On the Feature Selection page, make sure that Reporting Services will be installed on the local hard disk drive, and then click Next.
  12. On the Ready to Update page, click Install.
  13. On the Setup Progress page, click Next.
  14. On the Completing Microsoft SQL Server 2005 Setup page, click Finish.

Part II coming soon...!

Building Data-Driven Applications using SilverLight 3

The limited capabilities offered by Silverlight 1 & 2 shall be fixed in Silverlight 3 - on limited support for data binding and validation for complex data using your LOB applications!

Now Silverlight is leveraging not just it's capability to deliver Rich Internet Applications (RIAs) but also letting coders to talk and connect to line-of-business (LOB) applications based on the new DataForm control and enhanced support for data-driven applications.

Remember the prerequisites- a Silverlight-enabled Web browser. Read more... on the VS Mag Online!

That's all for now with the news...!

Windows 7 RC1: Download available from May 5th, 2009

The Windows 7 official website says, "The Windows 7 RC will be available May 5, and you'll be able to download it from this site through July. "
http://www.microsoft.com/windows/windows-7/

For developers looking to toss around a few lines of code on the Windows 7 platform, click http://msdn.microsoft.com/en-us/windows/default.aspx

*I have got mine through the partner community, wait for yours; couple of days more to go...!